


This tutorial is designed to provide an introduction to triggers, so readers should expect to gain a basic understanding of the concept, as well as its use in databases. Users will learn what triggers are, how they work, and how to implement them in their own databases using SQL code and DbVisualizer. Additionally, they will gain hands-on experience writing triggers, with guided examples to help them practice.
Triggers are database objects that perform a predefined action on given tables whenever users modify data in a database. They are useful because they guarantee if a modification to the database was successful or not. If it was successful, then the trigger action will be executed.
Use Cases for Triggers
Triggers are used for a variety of use cases, such as:
Enforcing Referential Integrity: Triggers can be used to enforce referential integrity by ensuring that related data is consistent across multiple tables. For example, a trigger can be used to ensure that a record in one table is deleted when a record in another table is deleted.
Auditing: Triggers can be used to log important events that occur in the database. This can be used for auditing purposes, or to track changes made to the database.
Data Validation: Triggers can be used to ensure that data entered into the database meets certain criteria. For example, a trigger could be used to ensure that a user’s age is greater than 18 before allowing them to access certain features.
Using triggers can improve database performance by letting us avoid the need to run manually written queries every time we modify data.
Triggers also provide an additional layer of data integrity and security by ensuring that data is valid and consistent and that only authorized users are able to modify the data. For example, the following trigger checks that the user is authorized before allowing any changes to be made to the database:
CREATE TRIGGER authorize_user
BEFORE UPDATE ON users
FOR EACH ROW
BEGIN
    IF (NEW.user_id != OLD.user_id) THEN
        IF (NEW.user_id NOT IN (SELECT user_id FROM authorized_users))                                                                                THEN
        RAISE_ERROR 'Unauthorized user detected';
        END IF;
    END IF;
END;
The main disadvantage of using triggers is that they can be difficult to maintain, as any changes to the underlying tables or data can cause the triggers to malfunction. In the example below, a trigger is set up to update the total_orders column in the customers table whenever a new order is placed.
CREATE TRIGGER update_total_orders
AFTER INSERT ON orders
FOR EACH ROW
    BEGIN
    UPDATE customers
    SET total_orders = total_orders + 1
WHERE customers.id = NEW.customer_id;
END;
If a column in the orders table is changed or removed, the trigger will no longer be able to update the customers table correctly, leading to incorrect data and malfunctioning of the system.
Another disadvantage is that triggers can be difficult to debug, as they are triggered by specific events and may not be easy to identify when a problem occurs. For example, a trigger is set up that should update a customer's address when they place an order, however, the address field is not updated when the order is placed. To debug this issue, the developer would need to identify which trigger is causing the issue. Is there a code error in the update_customer_address trigger or is the error in another trigger in the database which is preventing this one from running?
Creating a Trigger in DbVisualizer
To create a trigger in DbVisualizer, follow the steps below:
Step 1: Opening the Create Trigger Dialog The first step is to open the Create Trigger dialog. To do this, you will need to right-click on the table where you want to create the trigger and select the “Create Trigger” option as shown in the screenshot below.

Selecting the Create Trigger option.
Once you have selected the “Create Trigger” option, the Create Trigger dialog will appear as shown in the screenshot below.

The trigger dialog.
Step 2: Defining the Trigger Parameters in the Trigger Editor The second step is to define the trigger parameters in the Trigger Editor. The parameters that you can set include the name of the trigger, the type of trigger (e.g. insert, update, delete, etc.), the conditions for the trigger to be fired, the timing of the trigger (e.g. before or after the triggering event occurs), and the table that the trigger is associated with.

Defining the trigger parameters.
Step 3: Setting the Actions to be Taken The third and final step is to set the actions to be taken when the trigger is fired. You can define the action as either an SQL statement or a stored procedure. You can also specify the timing of the action (e.g. before or after the triggering event occurs).
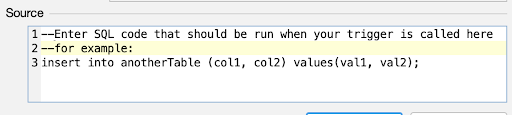
Action definition.
Now let’s get into an example of creating a trigger.
Trigger Example with DbVisualizer
Now that we have gone through the process of creating a trigger in DbVisualizer, let's take a look at an example of how to use a trigger to fire an action in the database. In this example, we have two tables; the Products table to store a list of products and the Products_quantity table to store the number of products in the first table. To make sure the number of products in the second table is updated, we will create a trigger that will update the Quantity column of the Products_quantity table when a new item is inserted into the table. To do this, we will need to create a trigger with the following parameters:
Name: Update_Quantity
Type: Insert
Condition: None
Timing: After
Table: Products
The trigger will fire the following action:
UPDATE
    Products_quantity
SET
    products = products + 1;
Once the trigger is written, you can save and activate it by clicking on the save icon or pressing CTRL + S. This will cause the trigger to be executed whenever a new product is inserted into the Products table.
You could also create the trigger in pure SQL by clicking on the Show SQL checkbox and entering the following code in the SQL editor:
CREATE TRIGGER
    `ContactManager`.Update_Quantity AFTER
INSERT
ON
    `ContactManager`.`Products` FOR EACH row BEGIN
UPDATE
    Products_quantity
SET
    products = products + 1;
END;

The Update_Quantity trigger’s SQL body.
This trigger will increase the quantity field in the Products_quantity table by 1 when a new product is added to the Products table. Once the quantity has been increased, the trigger will stop running. The @delimeter command is used to signify the start and the end of the trigger code.
Recursive Triggers
A recursive trigger is a type of trigger that can fire multiple times in response to a single event. This can be useful for tasks such as cascade deletes, where a record is deleted from one table and then all related records in other tables must also be deleted.
In order to create a recursive trigger, the trigger body must include a statement that calls the trigger itself. This statement must include a condition that will prevent the trigger from running forever. The condition might be that the trigger should only run when the number of times it has been called is less than a certain number.
For example, when a record is deleted from a customer table we also want to delete all related records in other tables. This means our trigger will be attached to the Customers tables. In this example, we will be deleting related records from just the Orders table, but you could delete them from as many tables as you like.
The trigger action will look like this:
DELETE FROM orders WHERE customer_id = OLD.customer_id;
IF (SELECT COUNT(*) FROM Orders WHERE customer_id = OLD.customer_id) > 0
THEN CALL DeleteOrders(OLD.customer_id);
END IF;
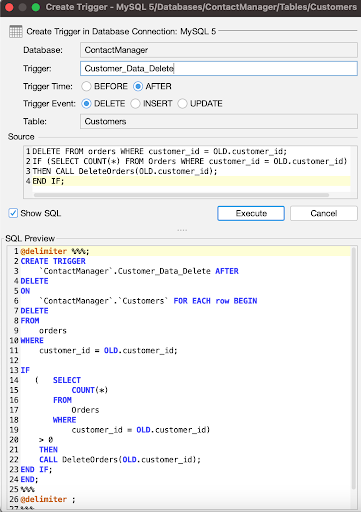
The Customer_Data_Delete trigger’s SQL body.
This trigger will delete all orders related to the customer whose record has been deleted in the customer table. The IF statement checks to see if there are any records left in the orders table for the customer, and if there are, the trigger calls itself to delete them. Once all of the related orders have been deleted, the trigger will stop running.
Conclusion
DbVisualizer provides an interface for database triggers, making creating and managing them easier. You can learn more about triggers in DbVisualizer in their official documentation. In this tutorial, you learned about triggers, how they work, their advantages, disadvantages, and use cases. You also learned how to implement them in your SQL database. All in a good day’s work.
Reach out to me on LinkedIn if you have any questions or just want to connect, return to our blog to learn more about databases and their functionality later on, and until next time!
About the author
Ochuko Onojakpor is a full-stack Python/React software developer and freelance Technical Writer. He spends his free time contributing to open source and tutoring students on programming in collaboration with Google DSC.