Learn how to leverage Snowflake's Time Travel feature in conjunction with DbVisualizer to effortlessly explore historical data, restore tables to previous states, and track changes for auditing and compliance purposes.
Tools used in this tutorial
DbVisualizer - top rated database management tool and SQL client.
Snowflake, cloud-based platform for data warehousing and analytics.
Introduction
Welcome to our tutorial on leveraging Snowflake's powerful Time Travel feature in combination with DbVisualizer. Snowflake's Time Travel provides an exceptional capability for data versioning, allowing you to delve into the past and query historical data effortlessly. By using Time Travel, you gain the ability to access data as it appeared at any given point in time within a specified retention period, all without the complexities of traditional backup and restore processes. This feature not only simplifies auditing and compliance requirements but also empowers you with granular control over data versions.
Throughout this tutorial, we will explore the numerous benefits and use cases of leveraging Snowflake's Time Travel. You'll discover how it facilitates data recovery, making it a valuable tool to rectify data corruption or accidental changes. Moreover, Time Travel enables historical analysis by uncovering data trends and patterns, empowering data scientists and analysts to gain deeper insights.
By leveraging Time Travel in conjunction with DbVisualizer, a versatile database management and visualization tool, you'll be able to efficiently query and explore historical data. This tutorial will guide you through the process of setting up Snowflake and DbVisualizer, configuring the connection, and demonstrating effective usage of Time Travel to enhance your data management workflows.
Get ready to unlock the full potential of Snowflake's Time Travel feature, as we equip you with the knowledge and skills to harness its power, streamline your data versioning processes, and uncover invaluable insights from your historical data. Let's dive in!
Prerequisites
To follow this tutorial, you will need the following:
Snowflake: Cloud data warehouse with scalable architecture and seamless data sharing.
DbVisualizer: Versatile tool for managing, querying, and visualizing databases through a user-friendly interface.
Knowledge of basic SQL syntax and queries.
Setting Up Snowflake and DbVisualizer
In this section, we'll walk you through the process of setting up Snowflake and connecting it to DbVisualizer, enabling you to seamlessly manage and analyze your data.
Creating a Snowflake Account and Setting Up a Virtual Warehouse
Begin by creating a Snowflake account if you haven't already. Visit the Snowflake website and follow their registration process.
Once you've successfully registered, set up a virtual warehouse in Snowflake. This virtual warehouse will serve as your computing resource for querying and processing data.
Within your Snowflake account, navigate to the Account section or dashboard where you'll find your account's connection details. This includes the URL, username, password, and role you'll need to connect to Snowflake.
Configuring a New Database Connection in DbVisualizer
- Launch DbVisualizer and open the "Database" menu. Choose the option to "Create a New Connection."

The database menu in DbVisualizer.
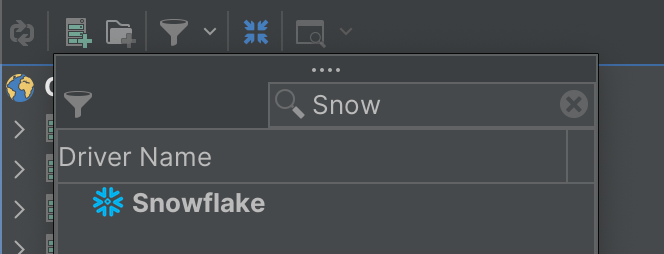
- Select "Snowflake" as the database type. This will prompt you to input specific Snowflake connection details.

The Snowflake driver.
Enter the connection details you obtained from your Snowflake account. This includes the URL, username, password, and role.
Choose the virtual warehouse you set up earlier from the available options. This warehouse will determine the compute resources allocated to your DbVisualizer queries.

Connection details for Snowflake.
- You might need to download the Snowflake JDBC driver before creating a connection if you haven’t already. To do that, navigate to the Driver manager:

Update Snowflake driver manager.
Then click on “Start Download” to download the required JDBC driver for Snowflake.

Download Snowflake driver manager.
- With all the necessary details input, click the "Test Connection" button within DbVisualizer. This will initiate a connection test to Snowflake using the provided credentials.

Snowflake connection successful.
If the test is successful, you'll receive a confirmation message indicating that DbVisualizer can connect to Snowflake using the specified parameters.
Exploring Time Travel in Snowflake
Time Travel is a powerful feature offered by Snowflake, a cloud-based data warehousing platform, that allows you to query historical data at various points in time. This feature is particularly valuable for analytical and auditing purposes, as it enables you to track changes to your data over time without the need for complex versioning or snapshotting mechanisms.
In Snowflake, every table is associated with a period, referred to as a "time travel period." This period represents the duration for which historical data is retained in the table. Snowflake automatically maintains a history of changes made to data during this period, allowing you to retrieve data as it existed at different points in the past.
Enabling Time Travel for a Snowflake Database
Enabling Time Travel is straightforward in Snowflake and can be configured at the database level. When creating or altering a database, you can specify the time travel retention period. This period determines how far back in time you can query historical data. Time travel retention can be set in terms of hours, days, or even for an infinite retention.
For example, to create a database with a time travel retention period of 30 days, the SQL query would look like this:
1 CREATE OR REPLACE DATABASE my_database DATA_RETENTION_TIME_IN_DAYS = 30;
This means that data changes made in the past 30 days can be queried using the Time Travel feature.

Create a database table in Snowflake.
Querying Historical Data Using Time Travel Syntax in DbVisualizer
DbVisualizer is a popular database management and visualization tool that supports various database systems, including Snowflake. To query historical data using Time Travel in DbVisualizer, you can follow these steps:
- Write a Time Travel Query:
Once connected, you can write SQL queries to access historical data using Time Travel syntax. The syntax involves using the AS OF clause in your query to specify the point in time you want to retrieve data from. For instance, a query like so:
1    SELECT *
2    FROM your_table
3    AT(TIMESTAMP => 'Sun, 13 August 2023 01:00:00 -0700'::timestamp);
Would fetch all rows from the specified table as they existed at the given timestamp.
- Execute the Query:

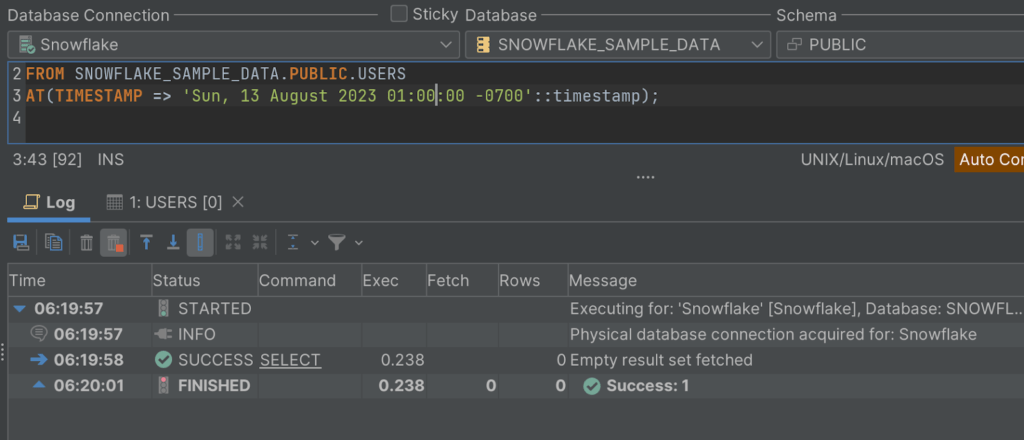
Executing the time travel query.
After writing the query, execute it in DbVisualizer. The results will display the data as it was at the specified timestamp, allowing you to analyze historical changes.
- Explore Historical Data:
You can further refine your Time Travel queries by adding additional conditions, joins, and aggregations, just like regular SQL queries. This enables you to perform in-depth analysis on historical data.
Let's say you want to further refine this query by adding an additional condition to filter the results. For example, you might want to retrieve only the users who registered before a certain date:
1    SELECT *
2    FROM SNOWFLAKE_SAMPLE_DATA.PUBLIC.USERS
3    AT(TIMESTAMP => 'Sun, 13 August 2023 01:00:00 -0700'::timestamp)
4    WHERE registration_date < '2023-08-01';
In this modified query, the "WHERE" clause filters the results to include only users who registered before August 1, 2023. This is an additional condition added to the Time Travel query to narrow down the historical data based on a specific attribute ("registration_date" in this case). You can continue to add more conditions, joins, and aggregations to perform more complex analysis on the historical data using the Time Travel feature.
Utilizing Time Travel for Data Recovery and Auditing
Time Travel in Snowflake goes beyond its role in historical data analysis; it also serves as a powerful data recovery and auditing mechanism. Whether you're exploring the past or rectifying accidental changes, Time Travel offers a smooth path to data restoration. This section delves into how you can employ Time Travel for data recovery and auditing purposes.
Restoring a Table to a Previous Point in Time using Time Travel
Time Travel in Snowflake not only facilitates historical data analysis but also serves as a data recovery mechanism. In scenarios where you need to restore a table to a previous state, Time Travel provides a seamless solution. Here's how you can achieve this:
Identify the Desired Timestamp: Determine the specific point in time to which you want to restore the table. This could be a timestamp just before the undesired changes were made.
Generate a New Table: Create a new table with the same schema as the original table. You can use the
CREATE TABLEstatement to do this.Insert Historical Data: Write an
INSERT INTOquery that utilizes Time Travel to retrieve the data from the original table as it existed at the chosen timestamp. For example:
1    INSERT INTO new_table
2    SELECT *
3    FROM original_table
4    AT(TIMESTAMP => 'Sun, 06 August 2023 01:00:00 -0700'::timestamp);
This populates the new table with the data from the past.
- Verification and Validation: After restoring the table, verify the data to ensure that it matches the state it had at the chosen timestamp. You can run queries to compare the new table's data with the original table's data at that time.
Auditing Changes and Tracking Data Modifications with Time Travel
Time Travel is a valuable tool for auditing purposes, allowing you to track changes and modifications made to your data over time. By leveraging Time Travel, you can maintain an accurate record of every change without the need for complex versioning systems. This is particularly beneficial for compliance, regulatory, and internal auditing requirements.
Enabling Detailed Tracking: With Time Travel enabled, Snowflake automatically keeps track of all changes to your data, including inserts, updates, and deletes, within the specified time travel period.
Querying Historical Changes: You can query historical data using Time Travel to investigate specific changes. For example, you can identify who made a particular change, what the change was, and when it occurred.
- To initiate this process, you first need to create the
audit_changestable, which will serve as a record keeper for changes:
1    CREATE TABLE audit_changes (
2        change_id INT AUTOINCREMENT PRIMARY KEY,
3        user_id STRING,4    change_description STRING,
5        change_timestamp TIMESTAMP
6    );
Subsequently, you'll establish a stream that captures historical changes for the target table. In this example, we're utilizing the USERS table:
1    -- Create a stream for the historical table
2    CREATE OR REPLACE STREAM historical_changes_stream ON TABLE
SNOWFLAKE_SAMPLE_DATA.PUBLIC.USERS;
Once the stream is in place, you'll construct a task to populate the audit_changes table with the changes extracted from the stream:
1    -- Create a task to populate the audit_changes table using the stream
2    CREATE OR REPLACE TASK populate_audit_changes
3        WAREHOUSE = COMPUTE_WH
4        SCHEDULE = '1 MINUTE'
5    WHEN SYSTEM$STREAM_HAS_DATA('historical_changes_stream')
6    AS
7    INSERT INTO SNOWFLAKE_SAMPLE_DATA.PUBLIC.audit_changes (user_id, change_description, change_timestamp)
8    SELECT'123', metadata$action, CURRENT_TIMESTAMP
9    FROM historical_changes_stream;
10
11   COMMIT;
- Finally, ensure the task starts executing with the following command:
COPY
1    ALTER TASK populate_audit_changes RESUME;
2    SHOW TASKS LIKE'populate_audit_changes';
3    COMMIT;

Checking task status.
Ensure that the task status is marked as "started," as illustrated in the image above.
With this configuration in place, any modifications made to the USERS table will be automatically captured and logged into the AUDIT_CHANGES audit table. This mechanism allows you to effortlessly maintain a detailed record of alterations and their respective context.

The audit_changes table.
Conclusion
In this tutorial, we've delved into Snowflake's Time Travel feature, showcasing its versatility in data recovery and auditing. Time Travel isn't just about historical analysis—it's a tool that simplifies data restoration and empowers robust auditing.
We began by grasping the essence of Time Travel—its ability to query data as it appeared at various times. This streamlines auditing, compliance, and versioning without complex backups.
We navigated setting up Snowflake and DbVisualizer, fusing data warehousing capabilities with an intuitive interface.
Our journey through Time Travel involved enabling it, executing queries in DbVisualizer, and refining queries for insights.
Beyond data recovery, we harnessed Time Travel for auditing. We explored restoring tables, tracking changes through an audit_changes table, and using Snowflake's features to populate it.
As we conclude, remember the fusion of DbVisualizer and Snowflake's Time Travel. This dynamic duo enhances data management, analysis, and visualization. Embrace DbVisualizer to unearth insights and streamline data tasks. Your data adventures await—happy exploring!
Frequently Asked Questions (FAQs)
What is Snowflake's Time Travel feature, and how can I use it to query historical data?
Snowflake's Time Travel feature allows you to access historical data within a specified retention period. You can query data as it appeared at different points in time, without the need for complex backup and restore processes. To learn how to leverage this feature alongside DbVisualizer for efficient exploration and analysis of historical data, check out the tutorial on "Leveraging Snowflake's Time Travel with DbVisualizer."
How can I effectively use Snowflake's Time Travel in combination with DbVisualizer for auditing and compliance purposes?
Ar: If you're interested in tracking changes and maintaining an audit trail for your data, you can leverage Snowflake's Time Travel feature alongside DbVisualizer. By following the tutorial on "Leveraging Snowflake's Time Travel with DbVisualizer," you can learn how to set up Snowflake, configure the connection, and use Time Travel to effortlessly explore historical data, restore tables to previous states, and track changes for auditing and compliance purposes.
What are some practical use cases for Snowflake's Time Travel feature, and how does it benefit data analysis?
A: Snowflake's Time Travel is not only valuable for data versioning and recovery but also for historical analysis. By using Time Travel, you can uncover data trends, patterns, and insights from the past. The tutorial on "Leveraging Snowflake's Time Travel with DbVisualizer" demonstrates how to harness this feature to enhance data analysis workflows, making it easier to gain valuable insights from historical data.
How can I connect Snowflake with DbVisualizer to streamline data management tasks and analysis?
A: Connecting Snowflake with DbVisualizer can enhance your data management and analysis capabilities. DbVisualizer is a versatile tool that allows you to manage, query, and visualize databases in a user-friendly interface. If you're interested in learning how to set up this connection and leverage Snowflake's Time Travel feature, check out the tutorial that provides a step-by-step guide on "Leveraging Snowflake's Time Travel with DbVisualizer."
Where can I find a comprehensive guide on using Snowflake's Time Travel feature with DbVisualizer for historical data exploration and analysis?
A: If you're looking for a detailed guide on using Snowflake's Time Travel feature alongside DbVisualizer, there's a tutorial available titled "Leveraging Snowflake's Time Travel with DbVisualizer." This guide walks you through the process of setting up Snowflake, establishing a connection with DbVisualizer, and effectively using Time Travel to explore historical data, restore tables, and track changes for various purposes.
About the author
Ochuko Onojakpor is a full-stack Python/React software developer and freelance Technical Writer. He spends his free time contributing to open source and tutoring students on programming in collaboration with Google DSC.

